The Secrets to Cooking a Perfect Brisket

153015268

If you love cooking, a brisket should be on your list of things to try out. While it may seem like a large task to cook a large cut of meat such as a brisket, the truth is that it is simple if you only follow a few basic guidelines. After reading this guide, you will be able to get a pot of a large, beefy and delicious braised brisket that will leave everyone showering you with praises.

The Beef

492366159
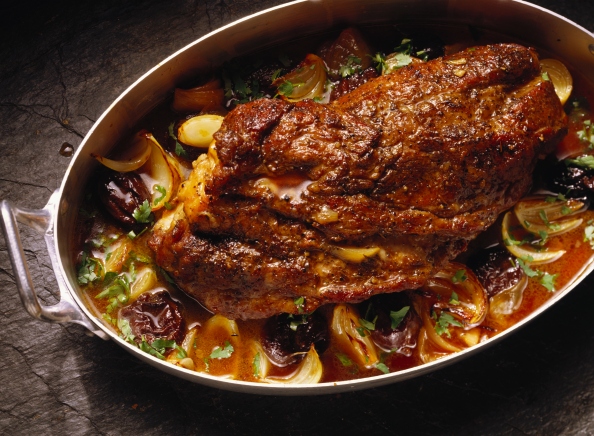
A brisket is a type of beef breast that is generally fairly tough and makes almost 60% of a cow’s weight. You can break down the tough fibers and make it tender by braising it low and slow. Most briskets are trimmed, though it’s good to have a bit of the the deckle (fat) which helps the meat to self-baste in the oven.

The Liquid

You can use simple seasoning (salt and pepper) because the brisket absorbs most of its flavor from the braising liquid. Ensure that your braising liquid is sweet and savory but also has enough tang to cut through the meat. A good braising liquid could be as simple as beef broth or even chicken broth, beer, or even just seasoned water. For a really flavorful braising sauce, we like to use red wine that has been slightly watered down.

The Vegetables

Cook the onions slowly to build a sweet foundation for the braising liquid. Use the tomatoes and tomato paste to add a sweetness to the brisket. Moisten the brisket using the braising liquid and leave some of the tomatoes and onions at the top to be caramelized to a delicious finish. You can add carrots (cooked until tender), parsnips or potatoes to the dish.

The Duration

The brisket becomes better and better depending on how long you’ll let it sit before cutting and slicing the meat. For the best brisket-eating experience, let it cool completely while it is still in the braising liquid. After it has cooled, remove the solidified fat that remained at the top. You can then take the brisket out of sauce, slice it against the grain to your preferred thickness, and then reheat it in the oven until it is bubbly and warm. With this done, you will be ready to serve a delicious meal.

Follow along with us for all of the most delicious stories online.

The Basics Of Braising Meats

200422705-001

For satisfying meals and fare for entertaining, learning how to braise food is a worthwhile endeavor. Large batches are as easy as smaller ones, and both fill a kitchen with rich and enticing smells. With the right equipment and a few techniques on hand, delicious braised foods are a breeze.

Pans and Pots for Braising

The best place to begin is with braising basics, and that means locating optimal equipment. Look for a heavy pot with a lid that fits tightly. You will need a pot that is large enough to contain all of the ingredients, and there must still be a couple of inches of room on top of the food. This extra space creates condensation that bastes the food as it cooks. A cast iron Dutch oven is a common choice.

Long Braise Vs. Short Braise

Next, it is important to understand whether short or long braising will be used. Short braising works well with vegetables and small poultry selections. Meals done via this method may be finished cooking in about an hour. Long braising is done over a lengthier period of time. This method cooks meats that can be tough, but the braising makes them tender through slow cooking at low temperatures.

Brown Meat On All Sides

Before beginning the braising process, the meat is browned. This step is crucial for ensuring the dish is as flavorful as it can be. To brown the pieces meat, begin by patting them dry. For fattier cuts, try a dusting of flour for searing a crust onto them. Use oil or duck fat that has been heated to high temperature, and make sure the pieces are evenly browned.

Braising Liquids and Braised Sauces

The final key to a successful dish is the sauce. The browning process gives the sauce its initial flavor kick, but the additional ingredients used to perfect the pot can make it special. Add vegetables to the bottom of the pan and give them a quick cooking to release the flavors. Mirepoix is often the vegetable mix of choice — containing onions, celery and carrots.

Next you need to add your braising liquid; this liquid is what does much of the cooking during the process by creating a flavorful steam around the meat while it is being roasted. Braising liquid can be anything including wine, beer, stock, or even a can of soda (used often in braised pork shoulder). Remember not to peak at the roast too often, as you will be letting out all that good steam. Also, remember to use enough liquid to last for however many hours of braising will be done.

Braised Sauce to Thick? Braised Sauce to Thin?

Overly thick sauces, for example, can be thinned with a splash of wine or broth. Thin sauces may be thickened by removing some of it to create a reduction in a sauce pan. Adding it back in will make the sauce in the pot thicker. Fresh herbs added at the end of cooking can provide a flavor boost.

Those are the basics of braising meats. It may take a while to get the hang of it, but don’t worry, the biggest mistake you can make is overcooking the meat, wherein the meat will be a little dry; however, it is difficult to create a braising catastrophe.

Follow us at Italian Home Kitchen Blog for the most delicious articles online.